ShopDreamUp AI ArtDreamUp
Deviation Actions
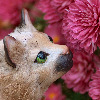
How I Art Doll - Final Results
- Click here to go back to the Table of Contents -
Back when I made this doll in 2015, I made my tutorial at the same time. The photos in the guide were all of him, and all the methods listed were the ones I used on him. But since I've learned how to make dolls better, I've replaced a lot of those pictures, and updated the information. It's a little sad he's been slowly shifted out, but this whole section has always been dedicated to him! He will always be special to me.
전광 (Jeon-gwang)means lightning in Korean.


And here my month and a half project is finally finished! I hope you enjoyed my journals, and I hope I've encouraged you to try making your own art doll! Good luck! 

4. Clay Parts
How I Art Doll- Click here to go back to the Table of Contents -
4. Clay Parts
Your doll can have lots of clay parts, or no clay parts at all! Doesn’t even have to be clay either, you can use any sculpting material as long as it is sturdy enough, such as Apoxie sculpt, thermoplastic, and resin cast parts.
After I’ve made my eyes and they’ve fully dried, I can then sculpt the face of my doll. I usually start with a core of aluminum on a tiny armature, aka my baking stand. This allows more room for it to fit in an oven, and the stand gives me a safe place to hold without accidentally squishing the clay.
Start sculp
Art Markers
I decided to get some Ohuhu art markers while they were on sale, I've always wanted to try art markers but didn't want to try something as expensive as Copic markers. I'm very glad I did! They are quite a different experience than water based markers, and they are not the same as sharpies. I tried to color fur with sharpies before, but they left the fur feeling rough and would transfer to your hands even days later like they never fully dried. So I expected the same result from the art markers, but I decided to try them on fur anyways.
And I was pleasantly surprised! It was very easy, and quite enjoyable, to draw on the fur with the
How I Art Doll - Airbrushing Fur
How I Art Doll - Airbrushing
Click here to go back to the Table of Contents
- Updated 2019 -
- Airbrush Parts -
You will need a compressor, airbrush, and a hose to connect the two. There are a lot of kinds of compressors and airbrushes and it can be overwhelming, I learned a lot from this site: www.airbrushguru.com/
I got all my parts from www.TCPGlobal.com, a company based in USA. The price for all my tools + paint was $158, 1 compressor with tank, 1 airbrush kit with 3 nozzles, 1 hose, and 4 2oz paints. The compressor I got specifically, is Master Airbrush brand TC-20T. It is very small, pretty quiet and good for small projects.
I DID IT!!!
My Etsy store is finally open!!! https://www.etsy.com/shop/StorybookCreatures
Took me forever to figure out and learn all the legal stuff involved... I'm a fast learner but this stuff took me a loooong time to grasp.
© 2015 - 2024 StorybookCreatures
Comments49
Join the community to add your comment. Already a deviant? Log In
Wow, I haven't found a that detailed toturial about making art dolls befor, it was really intresting! I learnd most things on my own, I made a lot of experiments befor I finally made a complete art doll and tested a lot of materials. Though I'd never use real fur, but I make them really completly diffrent XD